
Traceprep
Lynx Post Stack Seismic Processing
Version: V1.7
See also
Introduction to Traceprep
Traceprep is a highly interactive seismic trace processing program
with an intuitive user interface. It has a flexible range of processes, which
can be applied in any order, with multiple instances of any process. A
real-time trace viewer is included, to make the results of processing instantly
visible. Version 1.4+ of TracePrep contains a variety of processes for enhancing
CDP stacked data. Processes are installed as functionally related groups or
modules, which are licenced
individually, so that users may configure Traceprep for their own
particular applications.
In Traceprep, a "process" is an operation applied to a single seismic
trace or group of traces, from a trace file. Every process has an input, an
output and a set of parameters which control its operation. For each process,
the input stream of seismic traces is taken from the previous process in the
list and an output stream is sent to the following process. Processes can also
act as "sources" when they have no input, but take traces from a trace file or
generate them internally. "Sinks" are processes which write traces to an output
file or to viewer, before passing the trace to the next process.
A processing sequence is stored by Traceprep as a "process list"
containing the required processes. The process list can be applied to single
trace file, or multiple trace files in a batch. Every process in the list has a
unique process name with a description, which can be modified by the user. The
process list is saved in a project file, which contains the parameters for the
individual processes in the process list.
The process list is executed recursively, with each individual process
providing its own buffering. The process list will always start with a source
of traces and will end with a viewer or a sink, ie output to a trace file.
Processes which act on a single trace, such as band-pass filters, act
synchronously and output a single trace for every trace that is input. Other
2-dimensional processes, such as migrations, may buffer large numbers of traces
in memory or temporary files, before passing output to the next process on the
list.
Getting started with Traceprep
Before you can use Traceprep, you need a licence from Lynx Information Systems Ltd.
Seismic processing with Traceprep entails the following stages:
To set up a process list
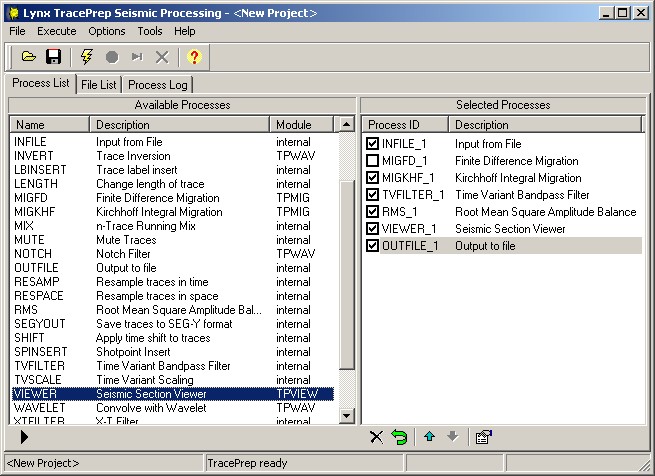
Click the "Process List" tab to display the available and selected processes.
Two lists are visible. On the left, "Available Processes" contains a list of all
the possible processes which can be selected. On the right, "Selected Processes"
shows the "process list", which is the current sequence of seismic processes,
to be executed from top to bottom of the list. The process list can be loaded and
saved in a process parameter file, with extension. SPS . To load a process list,
click the file open button  ,
on the left of the toolbar.
,
on the left of the toolbar.
Editing the process list
Available Processes The left hand panel shows the available
seismic processes. To add a process to the process list, select a process,
highlight it and drag it into the "Selected Processes" list, or click
on the single arrow button  below the bottom left side of the panel. A new
copy of the process will appear in the right hand panel. You can also make multiple selections
by holding down the Ctrl key when selecting the processes.
below the bottom left side of the panel. A new
copy of the process will appear in the right hand panel. You can also make multiple selections
by holding down the Ctrl key when selecting the processes.
Selected Processes The right hand panel shows the currently
selected processes. Every instance of a process has a (unique)
Process ID, to distinguish it from other process in
the same process list. The Description is used to identify a particular
instance of a process. Each process in the list also has a check box, which can
be checked (shows a tick) to make a process active. Inactive processes will not
be executed when you run the process list, but will be preserved when you save it.
If you add to the list another instance of a process which is already
in the list, it will automatically be given a new process ID, to distinguish it
from the other instances. For example, if you already have an instance of the
RMS gain process, named "RMS_1", a new instance of this process will be named
"RMS_2" and so on.
Select a single item in a list by clicking on it with the mouse.
Multiple consecutive items can be selected by clicking on the first item, and
then holding down the <SHIFT> key while selecting the last consecutive
item. Multiple non-consecutive items can be selected by holding down the
<CTRL> key while clicking each item with the mouse.
See
summary of buttons and keyboard shortcuts for manipulating
the process list.
Editing process parameters
Double clicking on a process in the list, in the right hand window, or
clicking on the edit button
 ,
will display the standard Lynx parameter editor screen showing the parameters
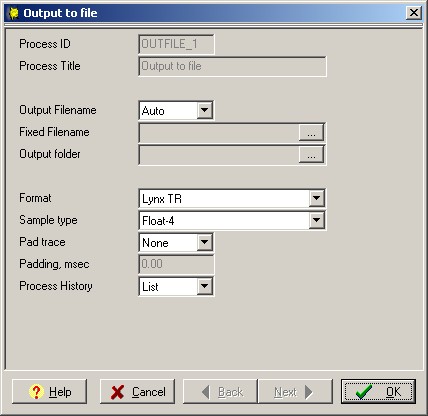
for the selected process. For example, double clicking OUTFILE_1
will bring up the parameter edit screen for the OUTFILE process
,
will display the standard Lynx parameter editor screen showing the parameters
for the selected process. For example, double clicking OUTFILE_1
will bring up the parameter edit screen for the OUTFILE process
Parameter editing uses PrmEdit, the standard
Lynx parameter editor form. To get help on an individual process parameter page,
press the F1 key while viewing process parameters. See also individual module
help files, e.g. TPBasic and TPViewer.
Process name and description
The first two parameters of every process, "Process name" and "Process Description" are common to every process.
Process Name is of the form PPPP_nnnn, where PPPP_ is the process identifier and nnnn
is the instance identifier.
For example, you could have 2 instances of the predictive
deconvolution process with different parameters, one with a 4msec minimum
prediction distance, the other with 32 msec prediction distance. These could be
named DECON_1 and DECON_2 and described as "4msec Gap Decon" and "32msec gap
decon".
You can also alter the process IDs, DECON_1 and DECON_2, remembering
that the the first part of the name must be DECON_ and the instance identifier,
following the underscore, must be unique.
Process Description is an optional text string, which can be
used to describe what the process actually does, or to identify the parameters
used in a particular instance of the process. Every process has a standard
description, but you may alter this for your own purposes.
Selecting Input Files
The first process in the process list will normally be an INFILE
process, or other source of seismic traces. When the process list is executed,
the INFILE process sequentially reads the next trace from a trace file and
passes it to the next process in the list, until all traces have been read. You
can choose in Input file mode parameter of INFILE
whether the process list will apply to a single trace file, or multiple trace files
To process a single file once, set Input File Mode to
"Single". The Input Filename field will be activated. Enter a file name
or choose a file by pressing the browse button to the right of this field.
Whenever you run the process list, the selected file will be used as input. The
current trace file list will be ignored.
To process multiple files, set Input File Mode to
"Multiple". In this mode, Traceprep will will use the "trace file list" as a
source of input files. Before you run the process list, select the required
input files, which will be listed in the "File List" tab of the main Traceprep window,
which enables you to add or remove trace files in the current trace file list.
The Trace File List
For use in INFILE's multiple files mode, a trace file list is held in
memory, containing the input trace files to be processed by the process list
when the Go  button is pressed. The process list is traversed once for every selected file in the
list. The trace file list can be saved as a text file in the working
directory whenever you save the current process list. The name of the trace
file list's text file is usually prefixed by the project file name, so that each
project has its own trace file list eg
button is pressed. The process list is traversed once for every selected file in the
list. The trace file list can be saved as a text file in the working
directory whenever you save the current process list. The name of the trace
file list's text file is usually prefixed by the project file name, so that each
project has its own trace file list eg
Project file name - MyProj.SPS
Trace file list name - MyProj_TrcFiles.txt
The trace file list name is stored in the "config" page of the process
list file, accessible through the Options|Configure main menu. When a new
process list is loaded, the appropriate trace file list is loaded to memory
from this file. When Traceprep is closed, the trace file list can be saved
in the directory from which the process list was opened.
To add or remove files in the trace file list, click the "File List" tab in
Traceprep's main window and select those that are to be processed.
Files can be selected or de-selected by highlighting / unhighlighting
them in the File List window
Running the process list
To run the process list, click Execute-Go .
For each input file, Traceprep makes a first pass through the process list,
checking parameters for each process and initialising workspace. If all is
well, the first trace is read from the input file, passed to the next process
in the list, which processes the trace and passes it to the next process and so
on. When the end of the list is reached, Traceprep returns to the beginning of
the list to process the next trace. Processing continues in this way until all
the specified traces form the input file have been processed, you press the
Pause button
 ,
or an error occurs.
,
or an error occurs.
Displaying results
To display the results of your processing, you can place one or more
VIEWER processes at any point in the process list.
Typically you will want to do "before and after" comparisons, by placing a
VIEWER after the input process and a second VIEWER at the end of the list before
the OUTPUT process. Viewers can be made "persistent", so that they remain after
the process list has finshed executing. You can then compare results, after
running the same process list again with modified processing parameters.
The Process Log
The process log is displayed in the right hand panel of the status
display, by clicking the "Process Log" tab in Tracepre's main window.
The log records information from each process as it runs and shows filenames,
status information and error messages. The process log is stored in a text file
in your Lynx Data directory. The name of the log file can be accessed through the
Options-Configure main menu.
Errors and Troubleshooting
Errors can occur for numerous reasons. They can manifest themselves as
unexpected results, where the output data do not look as they should, or
Traceprep may halt before or during processing with an error message.
When an error occurs, Traceprep attempts to "retire gracefully".
The fact that an error has occured is reported in the status bar.
The process log display will be toggled on so that the display can be
examined for error messages which may identify in
which process the error occurred. See Traceprep messages
for an indication of the type of error. When you have identified the process in
which the error occurred, go to the help file for the module containing the process
which failed and look at the error messages there.
Here are some of the more common causes for errors:-
- Missing or wrongly specified trace file
- Missing or wrongly specified auxiliary file
- Bad trace file format or extreme values in the traces
- Shotpoint, CDP or trace ranges do not match those in the auxiliary file
- extreme parameter values
Menus and Controls
The Main Menu
File-New Project clears the current
process list, after asking if you wish to save it. The default project list, as
defined in the startup
configuration, is set.
File-Open Project
 reads
a previously saved process list (with extension .SPS) from a process list file.
reads
a previously saved process list (with extension .SPS) from a process list file.
File-Save Project
 saves the current state of the process list to a file, with extension .SPS.
File-Save Project As displays a save dialog,
for the current project list to be saved as a new file
File-Print Process List prints the current
process list. The order that the process parameters appear in the printout depends on
the process module configuration used for Traceprep - the actual order is determined
by the [PROCLIST] processes list parameter in the project's .SPS file.
File-Save Trace File List saves
the current trace file list. Use the save dialog to choose a folder and filename
for the trace file list.
File-Save Log As enables the current
process log to be saved as a text file
File-Exit closes Traceprep, with a dialog
box requesting unsaved information to be saved.
Execute-Go
starts executing the current process list. Processing will continue until all input files have
been processed, an error occurs, or the Pause button is pressed.
Execute-Pause
suspends processing
Execute-Skip File
 If the input file trace file mode is "external" (see INPUT process) closes the
current input file and skips to the next selected file.
If the input file trace file mode is "external" (see INPUT process) closes the
current input file and skips to the next selected file.
Execute-Cancel
 Halts processing and closes current input file
Options-Configure enables the names of
the log file and the trace file list file to be changed. When you save the
process list, these filenames will be stored in the .SPS parameter file, along
with the process parameters. This enables a process list to be associated with
a particular trace file list.
Options-Clear Log Clears the log display
on the right hand panel of the Process Log status display
Tools is a user configurable menu, which
will appear if any external program tools have been installed. At startup,
Traceprep checks programs in the tools configuration list - if the programs are
accessible, they will be displayed on the tools menu. Lynx seismic programs,
such as TraceDmp, Seisview and Tracefix will start up with the last output file
from TracePrep loaded.
Help- Context Help provides help for the last component or menu that
was selected in the main window. You can get context help at any time by pressing
the F1 function key.
Help-Process Help provides help
for the currently selected process. To get help for individual process
parameters, double click the process in the right hand (process list) window,
then press F1 when the parameter is selected in the parameter editor
Help-Main Help goes to the top of this help file
Help-About displays version information for Traceprep
Command Line
Traceprep can be invoked in automatic (batch) mode from the system command prompt, or from
another program or shortcut by a command of the form
TracePrep [-pPARMFILE]
where -p is the option for Traceprep to load and run the process list
contained in the process list file PARMFILE. This can contain a trace
file list, which enables a set of trace files to be processed from a single
command.
Traceprep can also open SPS files without running them automatically, so
that SPS files can be opened from Windows Explorer by double-clicking them.
Use a command like
Traceprep PARMFILE
where PARMFILE is a process list SPS file
Parameters: Process List
The .sps file containing process list and associated process
parameters is written in standard Lynx ASCII parameter
file format. The actual pages in the parameter file will reflect the
selected processes. Each set of parameters for a given instance of a process is
put into one or more sections, corresponding to the pages for that process, as
they appear in the parameter editor. The section names are of the form:-
[name.i], where name is the process page name and
i is an integer representing a particular instance of the process.
Within the section, the parameters are written as text strings in the same
order as the appear in the editor.
Processes
(type string) This
hidden page contains a list of the process IDs in the process list. TracePrep
manages this list automatiically, according to the selected processes. The
order of processing is determined by the order in the list.
The Process ID is of the form
PNAME_xxxx
where PNAME is one of the process names
appearing in the left hand column of the available processes and xxxx is
a string used to distinguish multiple occurrences of the same process in the
process list. By default xxxx is set to "1" for the first occurrence of
a process, "2" for the second and so on.
For example, you can distinguish between two occurrences of the VIEWER
process by their default Process IDs, VIEWER_1 and VIEWER_2.
Selected
(type string )The
"checked" or selected processes are determined by a comma delimited list,
corresponding to the processes list, in which 1=checked and 0=not checked.
The example below shows a list of four processes, in which the third
(VIEWER_1) is not selected.
[PROCLIST]
INFILE_1,TVFILTER_1,VIEWER_1,OUTFILE_1
1,1,0,1
Startup Configuration
User Configuration on Traceprep startup
The Traceprep.ini file [startup] section contains keys which determine
- Module Selection
- Default Process List
- Default Trace File List Filename
- Default Process Log Filename
Module Selection
The moduleload keyword of the [startup] determines how Traceprep
searches for process modules in the executables directory
moduleload=fixed
Use the fixed list of of modules found in the [modules] section of
Traceprep.ini. If modules in the list are not actually found, or are not
licensed, Traceprep startup will fail.
moduleload=auto
Search for valid Traceprep modules in the system directory and load
them. Every Traceprep module INI file contains an entry in the [lynx] section,
with its own module name.
tppack=modulename
where modulename is the name of the Traceprep module, e.g.
TPUtl, TPMig etc.
Default Process List
default procs=PROC1,PROC2,.....,PROCn
This defines the default process list, when no default.SPS file exists
in the user's local directory. See the PROCLIST
parameter page. In general, the first process in any list should always be a
source of seismic traces, ie should read from a file, or generate synthetic
traces.The last process should be a "sink", ie should display traces or write
them to disk. A sensible default for the process list might be INFILE,VIEWER,
which will simply display traces, or INFILE,OUTFILE which will copy traces.
for example :-
default procs=INFILE,OUTFILE
default trace file list file name
The name of the default trace file list file can be set by :-
file list=defaultTracefileListName
for example,
file list=Tracefiles.txt
default process log file name
The name of the default process log file name can be set by :-
log file=defaultProcessLogName
for example,
log file=Proclog.txt
Tools configuration
External tools are executable programs which appear on the Tools main
menu item. These are listed in the [tools] section of Traceprep.ini, in the
form
[tools]
exename=filetype,description
where exename (with or without extension .exe, .com, .bat etc.)
is an executable file. If the extension is omitted, .exe is
assumed.
filetype is an optional keyword which causes the selected
tool to be recognised as a seismic tool and to open the latest (seismic) file
output by TracePrep. This keyword defaults to the value specified by the
seisfile keyword in the [labels] section of TracePrep.ini.
description is a description of the program, as it will actually
appear under the Tools menu e.g.
[tools]
Seisview=seisfile,Lynx Seismic
Viewer
TraceDmp=seisfile,Lynx Trace file dump
NotePad=Text editor
After running a processing sequence, selecting Tools-Seisview will
display the last file to be output. To disable this feature, omit the
filetype keyword and the tool will then be opened without a file.
On startup, Traceprep searches for executables in the Lynx system
directory, in paths determined by the system PATH environment variable and in
the paths determined by the Windows registry key HKEY_LOCAL_MACHINE;
\Microsoft\Windows\CurrentVersion\App Paths\ . Programs which can be
successfully located in this way will be displayed on the Tools menu.
Licensing Traceprep (Licence Help)
Traceprep can be used under a Temporary
Licence, which will run for a limited evaluation period, usually 5 days
from the date of download. Some processes may be restricted to outputting a
maximum number of traces, for evaluation purposes. The licence status of any
given process can be deduced from the symbols displayed on the left of the
Available Processes display.
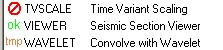
For a given process, there are four possible states
- no symbol - the process has a full licence
 - the process is not licensed and cannot be used
 - the process doesn't need a licence
 - the process is running under a temporary evaluation licence
To run the full version of Traceprep, you should obtain a licence from
Lynx for each of the process modules that you wish to use. Lynx will supply you
with a licence file, which you must install via the Licence Manager window.
If you already have a licence file, go to Options-Licence Manager on
Traceprep's main menu. On the Licence Manager window, press "Browse" and load
your licence file, which will usually have a .lnx extension. Close Traceprep
and re-start.
You can, if desired, remove
unlicensed modules
TracePrep module Configuration
Additional processes are added to Traceprep through the use of
external modules. Modules are individually licensed,
so you will need a valid licence from Lynx before you can run the programs in a
newly installed module. Normally the required modules will be configured by the
Traceprep install program, but it is also possible to add or remove modules
manually.
An external Traceprep process module comprises files, which are copied
to the Lynx system directory LynxSysX:
- One or more Dynamic Link Libraries or DLLs, containing executable
code to perform the processes
- An INI file containing process argument setup and other
information
- A help file in html format, plus its image files
The DLLs and INI files are copied to the Traceprep executables
directory LynxSysX, ie they are in the same directory as
Traceprep.exe.
The help files are copied to the of LynxSysX \docs sub
directory and any associated images .GIF or .JPG to the
LynxSysX\docs\images subdirectory
The [modules] section of Traceprep.ini normally contains keys, each
defining an added seismic process module, of the form:-
modulename=Version
modulename is the name of a LEA seismic process module.
Traceprep can also be configured to search for compatible modules automatically
on startup.
Version is the required version number range of the installed
module. For example if version contains the string "V1.0-V1.5",
Traceprep will accept DLLs with version numbers between 1.0 and 1.5. This is a
precaution to insure against incompatible DLLs being used in the future, if the
Traceprep's DLL interface is changed.
Update this section with the modulename and version range for the
installed module, e.g.
TPWAV=V1.0-V1.5
When you run the Traceprep setup, you can select which
modules are to be installed, or uninstalled. Note that if you install modules
which are unlicensed, the Lynx Licence manager dialogue will pop up and you
will be unable to proceed further with Traceprep until you have uninstalled the
unlicensed modules, or obtained licences for them. You can uninstall them by
re-running the Traceprep setup, or you can modify the installation
manually to remove temporarily the unlicensed modules.
Search for valid Traceprep modules in the system directory and load
them. Every Traceprep module INI file contains an entry in the [lynx]
section
Each module's INI file contains an key in the [lynx] section
tppack=modulename
where modulename is the name of the Traceprep module, eg
TPUtl, TPMig etc
Temporarily Disabling Unlicensed modules
To prevent the licence manager dialogue being invoked for an
installed, but unlicensed module, or to prevent any module from being loaded,
first open, in a text editor, Traceprep.ini, found in the Lynx system install
directory (e.g. C:\Lynxsys3).
Fixed module loading, when the [startup] section in
Traceprep.ini contains
moduleload=fixed
edit the Traceprep.ini file and comment out the entry for the
offending module in the [modules] section by inserting a semicolon character at
the beginning of the line, for each module to be disabled. In the following
example, the TPWAV module has been disabled in this way and will be ignored
when Traceprep starts up.
[modules]
TPUTL=V1.0-V1.5
;TPWAV=V1.0-V1.5
TP2DF=V1.0-V1.5
TPMIG=V1.0-V1.5
To reinstate a disabled module, remove the semicolon in the entry in
the [modules] section, but remember that this will only work if the required
module DLL, INI and help .HTM files are still in the Lynx system
directory.
Automatic module loading, when the [startup] section in
Traceprep.ini contains
moduleload=auto
If you wish to remove the module tpmodule permanently, delete
tpmodule.dll and tpmodule.ini from the Lynx system directory
(e.g. C:\Lynxsys3). To disable the module temporarily, find the module's INI
file tpmodule.ini, open it in a text editor and comment out the tppack
key in the [lynx] section, by inserting a semicolon at the beginning of the
line, e.g.
;tppack=tpmodule
Trace file Formats
Traceprep can be used with various input trace file formats, depending
on the installed version of Seisio.dll. This will commonly allow both Lynx and
SEG-Y files to be read and written. There are, however, significant differences
between SEG-Y and Lynx trace formats. (see Exploration Archivist formats
documentation for details). Note that Traceprep internally uses LYNX format, so
that trace headers are LYNX type, which means that values such as shotpoints, X
and Y coordinates are carried as floating point numbers. Trace sample values
are likewise carried internally as IEEE floating point numbers. If you process
from SEG-Y to SEG-Y format, bear in mind the following considerations.
Shotpoints
Shotpoints are used as a parameter or key for defining the
relationship between an individual trace and auxiliary data, such as its
position on the base map. With SEG-Y input data, the shotpoint trace
relationship is defined by the energy source point values inserted into the
individual trace headers (bytes 17-20). If you want to use processes which rely
on shotpoint numbers (e.g. XYINSERT) make sure that proper shotpoints have been
inserted into the trace headers of the input file, or with a preceding SPINSERT
process.
Also be aware that the SEG-Y standard specifies INTEGER shotpoints -
if the number of shotpoints per trace is less than one, shotpoint numbers
derived from the input file may be repeated on adjacent traces. This may
produce incorrect results when, for example, inserting X-Y coordinates into
trace headers and relying on shotpoint numbers.
Shotpoint trace relationships
With LYNX format files, a regular shotpoint trace relationship is
established by the FirstSP and SPIncr fields in the file header. Irregular or
discontinuous shotpoints are handled by the SPNo and SPAux trace header fields,
after an SPINSERT process. (see SPINSERT documentation for more details). SEG-Y files
written by Lynx 3S or Exploration Archivist software also contain FirstSP and
SPIncr fields in unclassified bytes within the SEGY binary file header area.
This enables regular shotpoints with non-integer intervals to be carried
correctly, but software from other vendors will be unable to use these values
and will normally look only at the integer shotpoint values in the standard
SEG-Y defined position.
Trace sample value range
In both SEG-Y and LYNX trace file formats, you can choose 2-byte per
sample (integer) or 4-byte per sample (Floating point) format for the trace
sample points. The advantage of integer format is that the trace files take up
only about half the disk space taken by floating point. If file size is a
problem, then read on, otherwise save yourself the worry and use floating point
format.
When using SEG-Y 2-byte integer format the amplitude of the traces
must be properly scaled to taked full advantage of the limited dynamic range
allowed by 2-byte integer numbers. Sample values with an absolute value less
than 1.0 will be rounded to zero in SEG-Y integer format. Sample values with an
absolute value of greater than 32767 will be truncated to that number.
Typically, seismic traces will have peak to peak values of no more than 5 times
their root mean square (rms) value. If the rms is 2500, the peak to peak of
will be about -12500 to + 12500, which fits nicely inside the integer range
afforded by 2-byte format and allows a large margin for extreme values (bright
spots, perhaps?). The dynamic range is about 80dB and still more than adequate
for most seismic data. The conclusion is that when using SEG-Y 2-byte integer
format, you should scale the traces to an rms of between 2500 and 5000 before
output.
Lynx 2-byte format gets around the scaling problem inherent in SEG-Y
2-byte format by scaling each trace before it is written to the output file. A
scale factor and bias value are applied to make the peak to peak values of the
trace fit exactly in the 2-byte integer range. When the trace is read back, the
process is reversed. This means that traces with any rms amplitude can be
stored in 2-byte format without having to worry about the rms amplitude. The
only drawback is that traces will carry a very small positive or negative bias
(about 1 part in 32767) due to the rounding and truncation errors involved in
this process. This bias will not normally be a problem, but can be removed if
necessary by applying a low cut filter and saving to 4-byte
format.
Program Messages
Quit processing this file? when the pause button is pressed,
this message is displayed
Bad proclist count An error
occurred when loading the process list. The number of selected process flags
disagrees with the number of actual processes in the process list. The the
process list file is probably corrupted
Process list loading failed The
process LoadfromFile operation failed. The process list file is corrupted,
missing or you do not have rights to read the file.
Missing process instance A selected
process could not be found in the process list file. See "unknown process name"
below
Scratch directory does not exist
dirname The scratch directory dirname, used by Traceprep for
storing temporary files, did not exist. An attempt was made to create it, but
this failed.
Unknown process name The process
name, loaded from the process list file, does not exist. This can happen if the
process list file that you are using was created with a Traceprep module that
is no longer installed.
Processing cancelled Processing was
cancelled after the Pause and Cancel buttons were pressed
Processing suspended The pause button
was pressed. You can continue, by pressing the Go button, Skip to the next
file if a trace file list is active, or Cancel processing.
Missing module DLL Traceprep was
attempting to load a module, but could not find the DLL in the Lynx system
directory. Install the missing DLL and ini file, or set moduleoad=auto in
program startup.
Bad module DLL library information
Traceprep was attempting to load a module, but the DLL contained invalid
information or was corrupted in some way
Module ini file registration failed
Traceprep was attempting to load a module, but could not register the module
INI file. This is probably caused by a damaged installation - the .ini file is
corrupted.
Module DLL version check Traceprep
was attempting to load a module, but the version number in the module DLL did
not match the version number in the module's INI file. This is probably caused
by a corrupted installation. You can disable the module temporarily, by
modifiying the program startup.
Processing completed The current
processing sequence is completed
Bad process ID While editing the
process ID field, an invalid process ID was entered.
Process not found in list of those
available A process, which could not be recognized by Traceprep, was found
in the project file, ie the process name did not match any of the available
processes. It is possible that you are trying to use a project file saved from
another installation of Traceprep, which had process modules which are not
enabled in your installation. Alternatively, the project file may be
corrupted.
XXXX process not licensed An
attempt was made to load process XXXX from a process list file, but the
process is not currently licensed. This can happen if you try to use a
previously saved process list in a now unlicensed installation of Traceprep
Too few processes to execute There
were less than two active processes in the list of selected processes. Make
sure that the right checkboxes are checked in the process list, beacause
unchecked processes are ignored. For meaningful trace processing, you need at
least a source of traces (e.g. INFILE), a process that does something to the
traces and a sink, e.g. OUTFILE or VIEWER.
See also
© Copyright Lynx Information Systems Ltd 2011