
1. Introduction
UKO2SHP will import seismic location data from a text file, and
create a polyline-M ESRI File Geodatabase feature class or shape file.
Seismic location data is usually transferred as some sort of ASCII file containing a number of
coordinate records per seismic line. Each record usualy contains the line name,
shotpoint number, XY coordinate and/or lat/lon coordinate. The format of these
files varies enormously. This utility allows you to specify how to convert
these files.
UKO2SHP can also read 'standard' UKOOA and SEG-P1 location files in EBCDIC format.
2. Running UKO2SHP
Open an existing configuration using the File-Open
Configuration menu, or select an import file by entering its name in the
Import Filename edit box. Alternatively you can drag a configuration or
import file from an Explorer window.
Click the Preview button to display the first part of your specified import file.
Click the Next button, and enter the number of header (non-data) records the file contains,and
whether the fields in the import file are delimited by character (CSV-type
file) or position (UKOOA-type file). On the next page, specify the columns
which define each of the fields in the file: Line Name, Shotpoint, X and Y, and
select the conversions to apply (if any) on the coordinate fields, and click
Preview to highlight your defined columns in the preview window. On the
next page select an output type and feature class name then click the Output button
to create the feature class.
2.1 Command-line options
UKO2SHP can be started with a command-line similar to the following:
UKO2SHP [-pCONFIGFILE]
where:
CONFIGFILE is the full path of a configuration file with an u2s extension. This file can be created using the Save Configurationmenu. If no parameter file is specified, then UKO2SHP will look for the file default.u2s in your current 'favourite' folder (the first existing folder in your LAUNCHER-maintained list).
3. Menus and Controls
3.1 Main Menu
The main menu allows you to load and save configuration files.
- File
- New Configuration
Create a new configuration using the default parameters.
If a DEFAULT.U2S file exists in your current 'favourite' folder (the first existing folder in your LAUNCHER-maintained list) then the default parameters will be read from here, otherwise, system defaults will be read from UKO2SHP.INI - Open Configuration

Open an existing configuration file - Save Configuration

Save the current configuration. - Save Configuration As
Save the current configuration with a new file name
- New Configuration
Preview button  - this will display the import file in
UKO2SHP's preview window, allowing you to determine how to customise the import of this file.
- this will display the import file in
UKO2SHP's preview window, allowing you to determine how to customise the import of this file.
Back button  - display the previous parameter page.
Next button  - display the next parameter page.
Output button  - create the output feature class.
If it already exists, it will be overwritten
- create the output feature class.
If it already exists, it will be overwritten
3.2 Converting UKOOA and text files to feature classes
3.2.1. Set Input Text File
UKO2SHP presents a number of pages of parameters which determine how the import file is customised for conversion into LOC format.
The first page defines the type of the input file.

Input Filename - browse for the file to import, or drag and drop the file from an Explorer window
Line Delimiters - select from:
- Auto-detect (default) - UKO2SHP should usually be able to determine the type of line delimiters in the file, unless the lines are very long, or use a non-standard fixed length.
- MS-DOS (CRLF) - ASCII lines delimited by carriage-return and line-feed characters (hex 0D 0A), standard for text files on DOS and Windows.
- UNIX (LF) - ASCII lines delimited by line-feed character (hex 0A), standard for text files on UNIX systems.
- MAC (CR) - ASCII lines delimited by carriage-return character (hex 0D), standard for text files on MACs.
- No delimiters (fixed-length records) - Each record follows immediately after the previous one. A true UKOOA file (or a Lynx LOC file) has no delimiters - that is why you cannot edit it in a normal text editor.
- Custom delimiter - each record is delimited by a custom byte sequence. Not yet implemented.
Record Length (bytes) - enabled if Line Delimiters (above) is set to No delimiters. Enter the length of the records in the input file. In this context, a "record" contains the location data for a single shotpoint. For many files this value will be 80 bytes. If in doubt, dump the file before running UKO2SHP and count the number of bytes between consecutive line name fields.
Convert EBCDIC to ASCII YES/NO - enabled if Line Delimiters (above) is set to No delimiters. Standard UKOOA files are written in EBCDIC. If the file in the preview window appears garbled, it may need translating from EBCDIC.
Custom Delimiter (hex values) - enabled if Line Delimiters (above) is set to Custom delimiter. Not implemented.
Preview Load (bytes). the number of bytes to load from the import file into the preview window. Default value is 100000 bytes.
Number of Records to Output - set this to a very large number to output all records from a file.
Click Next to move to the following parameter page.
3.2.2. Column Definitions
The next page defines the number of header records, field delimiters and input record identifiers.
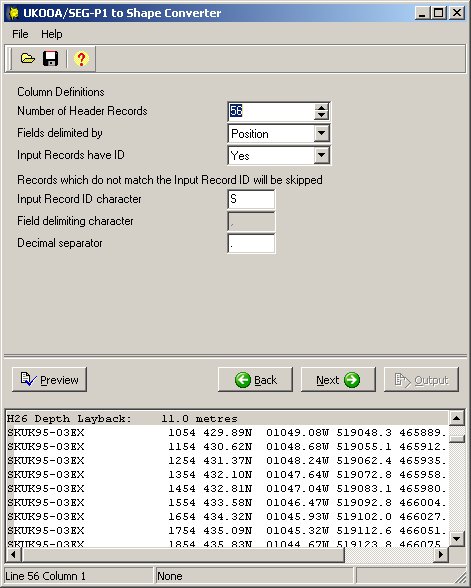
Number of Header Records - enter
the number of non-data records at the start of the input file. UKO2SHP
will skip these records, since feature classes contain no headers.
If you click the Preview button after setting this value, the header records will be
highlighted in grey, and the preview window will scroll to the first record to output.
Fields delimited by - select from:
- Position - fields are arranged in columns, as in standard UKOOA or SEG-P1.
- Character (CSV) - fields are separated by a specified character, usually a comma.
Input Records have ID - YES/NO - select YES if the first byte of each record in the input file has a UKOOA identifier character, usually S,G,Q or A.
Input Record ID character -
enabled if Input Record ID character is YES. Enter the character
that identifies each data record.
Records which do not match this character will not be output.
Field delimiting character - enabled if Fields delimited by Character (CSV). Enter the character which separates fields on each line - usually a comma or a semi-colon.
Decimal separator - enter the
character used as a decimal separator for shotpoints and coordinates. This is
usually a period ('.') or a comma (','). Note that for CSV files, the field
delimiter and decimal separator must not be the same character.
For standard UKOOA files, the decimal separator will be a period.
For CSV files, the delimiter and decimal separator may depend on the regional settings (locale) of
the workstation on which the file was created: for British or North American
locales, the field delimiter will usually be a comma and the decimal separator
a period; for European locales the field delimiter will usually be a semi-colon
and the decimal separator a comma.
Click Next to move to the following parameter page.
3.2.3. Set Column Positions
This page defines the actual columns occupied by the data. A different set of parameters are displayed depending on whether the columns are delimited by position or character:
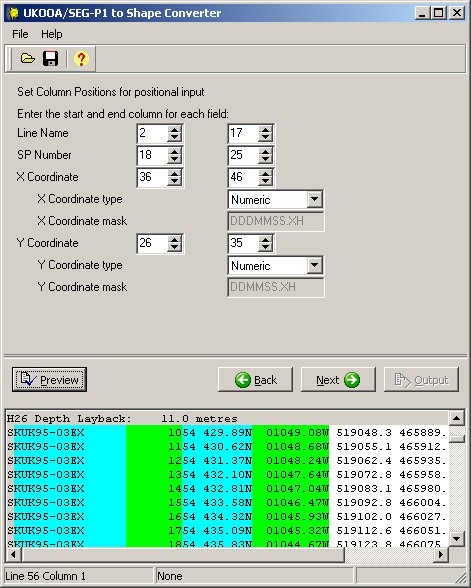
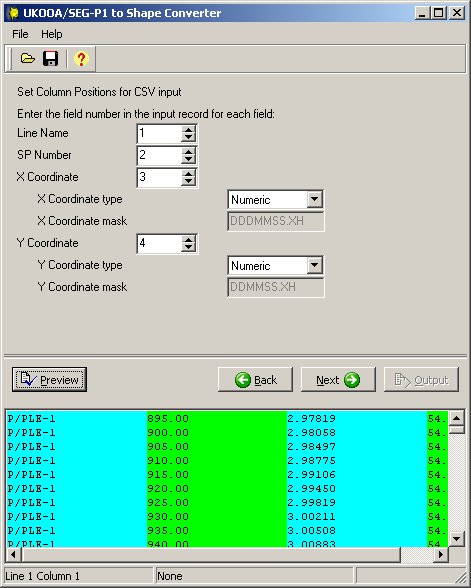
The conversion to a feature class requires that each line in the input file contains the following fields:
- Line Name
- SP Number
- X Coordinate (or longitude)
- Y Coordinate (or latitude)
UKOOA files may contain both latitude/longitude and projected XY (UTM) coordinates; in these cases you will need to decide which of these to output, as feature classes can only contain one set of coordinates. When UKO2SHP is being run from Lynx Seismap you will be prompted to set the spatial reference info for feature class after it has been created.
This page also allows you to specify how to read the X and Y coordinates:
X Coordinate Type
Y Coordinate Type
Select from:
- Numeric - (default) use this option for standard X and Y coordinates, or latitude/longitude values displayed as decimal degrees. Ensure that the decimal separator is defined correctly.
- Standard Degrees Minutes Seconds - use this option for latitude/longitude stored in the standard UKOOA format with no embedded spaces: DDDMMSS.XXH for longitude (X coordinate) and DDMMSS.XXH for latitude (Y coordinate). The coordinate values will be converted into decimal degrees as used by the feature class.
- Decimal Seconds - use this option to convert the latitude/longitude coordinate values from decimal seconds into decimal degrees. Postive values will be assumed north and east, negative values will be assumed south and west.
- Custom Mask - use this option to define a template for the conversion of latitude/longitude values to decimal degrees. You may need to use this option if the coordinates contain embedded spaces, or if the coordinates are stored in some unusual format such as decimal minutes.
X Coordinate Mask
Y Coordinate Mask
This option is enabled when the Coordinate Type (above) is set to Custom Mask.
A latitude/longitude mask consists of the characters 'D' 'M' 'S' 'X' 'H' and '-'.
All other characters in the mask are ignored.
D specifies degrees
M specifies minutes
S specifies seconds
X specifies decimals
H specifies the hemisphere character
- is a West/South indicator if no hemisphere character is present and the coordinate values are not signed.
This mask character need not correspond directly to a character in the input
string. Add it to the end of your mask to specify that all latitudes are south,
and all longitudes are west.
The following examples demonstrate a number of input formats, and the masks which would be required to convert them into decimal degrees
| Input coordinate | Mask (note the embedded spaces) | UKOOA standard equivalent | Decimal equivalent |
| 32 12 45.246N | DD MM SS.XXXH | 321245.24N | 32.21257 |
| 115 22 13.45W | DDD MM SS.XXH | 1152213.45W | -115.37040 |
| 54 22.50 N (This coordinate value contains no seconds, it is stored as degrees and decimal minutes) |
DD MM.XX H | 542230.00N | 54.37500 |
| 3 514.56 (This coordinate value is missing a hemisphere indicator, but is known to be a latitude in the southern hemisphere) |
DDMMSS.XX- | 030514.56S | -3.08738 |
Click Next to move to the final parameter page.
3.2.4. Output to Feature Class
The final parameter page allows you to select the output format and destination. You can output to a shape file, or save as a feature class in an ESRI File Geodatabase.
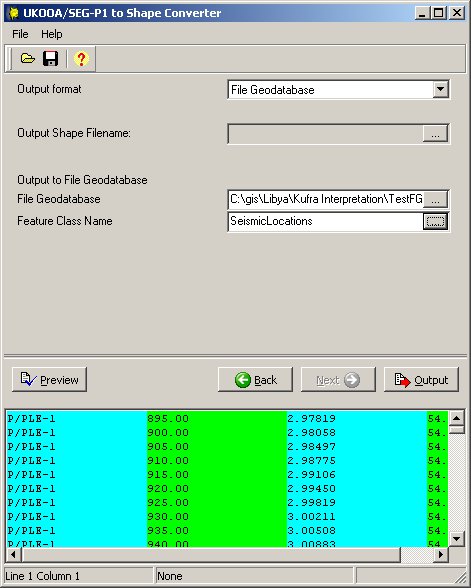
Use the Preview button to display the coordinate records for output after applying the custom mask or latitude/longitude conversion. You can use this to check whether you have set the correct coordinate type for the X and Y coordinates.
For shape file output, select a directory and enter a file name for the output shape file. If you select a file which already exists, then this file will be overwritten.
For file geodatabase output, select a file geodatabase using the folder tree dialog. You can create a new file geodatabase if you wish - ensure that the file geodatabase folder has extension .gdb, otherwise the browser dialog will not allow you to select it. Then select a feature class name. If you select a feature class which already exists, it will be overwritten. Feature class names must conform to ESRI File Geodatabase naming restrictions - no spaces in names and must start with a letter (not a number). Please note that file geodatabase output is disabled when UKO2SHP is run from an ArcGIS 9 installation of Lynx Seismap, as the File Geodatase API specification is available only for version 10 file geodatabases.
Click the Output button to create your feature class.