
1. Introduction
Lynx Seismatch is primarily a utility for reconciling seismic data files with seismic location data. You can determine whether the line names in your seismic data (SEG-Y) files match your seismic location data, and overlay the shotpoint ranges from the seismic data and location data on a map. You can change the line names in seismic data files or location data to match each other, and view and print reports of the overlapping shotpoint ranges to determine the total length of seismic lines. You can also export a Lynx Seismap-compatible shapefile containing seismic locations and seismic data filepaths, and insert coordinate and shotpoint information into the trace headers of your seismic data files
Additionally you can use Lynx Seismatch to read coordinate and shotpoint information from your seismic data files and create a location file.
2. Running Lynx Seismatch
To use Lynx Seismatch for reconciling, you will need:
- A 2D seismic locations file, in Lynx LOC format or as a polyline-M ESRI shape file.
- 2D Seismic data files in SEG-Y or Lynx Trace format
Open the locations file using the File - Open Locations
![]() menu (or drag the file from an Explorer window onto the Location File tab page).
The locations file will be opened and displayed as a map in the Location File tab page.
menu (or drag the file from an Explorer window onto the Location File tab page).
The locations file will be opened and displayed as a map in the Location File tab page.
Add your seismic data files to the seismic list using the Seismic
- Search Folder ![]() or Add Files
or Add Files ![]() menus (or drag the files from an
Explorer window onto the Seismic List tab page). The line name and shotpoint range will be
read from each file added.
menus (or drag the files from an
Explorer window onto the Seismic List tab page). The line name and shotpoint range will be
read from each file added.
The Location File tab will now display an map overlay of the seismic data shotpoint ranges on top of the shotpoint ranges read from the locations file. Using the Report menu you can display a number of different reports on your seismic and location data, which you can view in the Reconciliation Reports tab page.
In your seismic list, line names which match the location file will be shaded - you can
change line names by editing directly, or click the Browse button next to each line name to select
from a list of lines read from the current locations file. You can also use the map view on the
Locations tab page to interactively link seismic locations with seismic data files: click the
Match - Associate Linename ![]() menu to toggle into Associate
mode. Now when a line is selected on the map (or by using the Select from List option), you
will be presented with a list of all the seismic files in your seismic list - highlight the files
for this line to alter the line name in your seismic list. You can have more than one seismic data
file for each location, and the shotpoint ranges do not necessarily have to be the same for all
seismic data files with the same line name.
menu to toggle into Associate
mode. Now when a line is selected on the map (or by using the Select from List option), you
will be presented with a list of all the seismic files in your seismic list - highlight the files
for this line to alter the line name in your seismic list. You can have more than one seismic data
file for each location, and the shotpoint ranges do not necessarily have to be the same for all
seismic data files with the same line name.
When all your data are reconciled, you can export a Lynx Seismap shape file - this will create a shape file using the information in your seismic list. Filepath and shotpoint range will be added as attributes to each polyline-M, enabling this shape file to be used for hyperlinking.
You can also save your changes to the seismic list back into the seismic data files using the Seismic - Save Changes to Seismic Files menu.
To use Lynx Seismatch to read XY coordinates from seismic data files, and
create a Lynx LOC or ESRI shape file, first add your seismic data files to your seismic list using
the Seismic - Search Folder ![]() or Add Files
or Add Files ![]() menus (or drag the files from an Explorer window onto
the Seismic List tab page).
menus (or drag the files from an Explorer window onto
the Seismic List tab page).
To determine the format of the XY coordinates in the seismic trace headers, right-click a seismic file and select Open in TRACEDMP to examine the trace headers for a file in the Lynx TRACEDMP utility. Once you have determined whether the seismic files use a standard format or a customised format to store the coordinates, set the Extract Coordinate Options, and then select Extract Coordinates to create a new temporary Lynx LOC file.
When all coordinates have been read (this may a few minutes for a large list of files), you
can view the new Lynx LOC file in the Location File tab page. Obviously the shotpoint ranges
and lengths of the seismic locations and seismic data files should match exactly, you can confirm
this by checking the reports in the Reconciliation Report tab page. You can save this new
Lynx LOC file using the File - Save Locations As ![]() menu, or export it to a shape file using File - Export to Seismap Shape
File
menu, or export it to a shape file using File - Export to Seismap Shape
File ![]() .
.
3. Menus and Controls
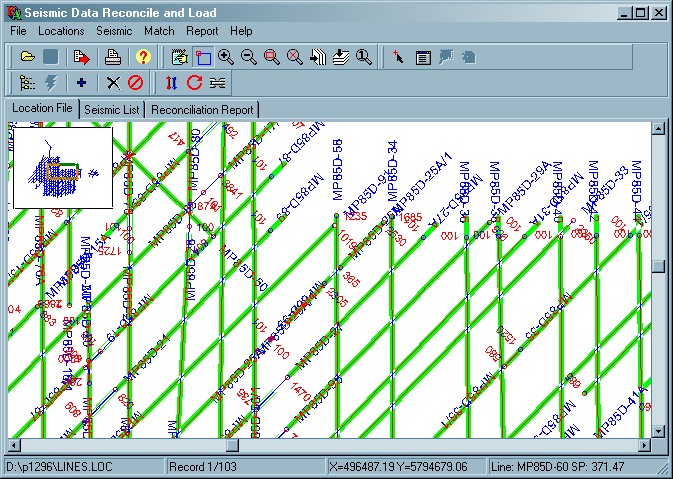
This screen shot shows a location file open in the Locations tab page, and overlapping shotpoint ranges from the seismic list highlighted in green.
3.1 Main menu
3.1.1 File menu
- Open Locations

Select a seismic locations file from the standard Open dialogue. The locations file can be either a Lynx LOC format or an ESRI shape file containing polyline-M shapes. You can also drag a file from an Explorer window onto the Locations tab page. The selected file will be loaded into the map viewer displayed in the Locations tab page.
- Save Locations As

Seismatch allows you to edit the line-names in your locations file.
After modifying your input locations file, you can overwrite it or select a new file name using the standard Save As dialogue. - Export
- Export - To Seismap Shape File

After reconciling your seismic locations and seismic data, this option will export a shape file which is compatible with Lynx Seismap and ESRI ArcGIS™.
A PRMEDIT dialogue will prompt you for the following parameters:Export to Seismap shape file
Export shape file - select a filename for the output shape file. If the selected file already exists, it will be overwritten.
Coordinate type - XY or Lat/Lon - this option is disabled, but will display the coordinate system of the output file. Shape files can only contain a single coordinate system. If the input LOC file contains both Lat/Lon and projected XY coordinates, use the Locations-Display Options
 to
change the current coordinate system.
to
change the current coordinate system.
The coordinate system of the exported shape file will be the same as the current locations display, but the shape file will not contain details of the projection system used. ArcGIS uses a separate file with a prj extension to store projection information for shape files - these files can be created manually in ArcCatalog.SP Ranges to match seismic trace files? - Yes or No - chose NO to output the shotpoint ranges of lines from your locations file, or YES to use ranges from each reconciled seismic data file in your seismic list. The first and last shotpoint coordinate values will be interpolated or extrapolated from surrounding nodes (see Match Options for details of the extrapolation algorithm to use).
The output shape file will contain a polyline-M shape for each reconciled seismic data file, using shotpoint values as measures. The shape file attribute table will contain the following fields: LINENAME, FILEPATH, FIRST_SP, LAST_SP.
- Export - To LOC File
After reconciling your seismic locations and seismic data, this option will export a Lynx LOC file which contains the interpolated/extrapolated shotpoint ranges of your seismic data files for each reconciled seismic line.
If you have more than one seismic data file with the same line name, shotpoint ranges will be combined, so that the output LOC file does not have repeated linenames.
A PRMEDIT dialogue will prompt you for the following parameters:Export to Lynx LOC shape file
Export LOC file - select a filename for the output LOC file. If the selected file already exists, it will be overwritten.
SP Ranges to match seismic trace files? - Yes or No - chose NO to output the shotpoint ranges of lines from your locations file, or YES to use the shotpoint ranges from your seismic data files. The minimum and maximum shotpoint ranges will be aggregated from all seismic files in your seismic list which match each linename, and the coordinates of these shotpoint values will be interpolated or extrapolated from surrounding nodes (see Match Options for details of the extrapolation algorithm to use).
The exported LOC file will only contain coordinates in the current display coordinate system, as interpolated/extrapolated coordinates cannot be reprojected within Seismatch. You can use LOCPREP Projection Conversion to recalculate the geographic LL coordinates from the projected XY coordinates (or vice versa).
- Export - Seismic Data to Export Folder
Copy all the seismic data files in your list into a new folder location. Select a destination folder to copy all listed seismic files. This option may be useful if you have a assembled a seismic list from a number of different input folders, or if you have removed files from the list if they cannot be reconciled with your location data. If files with the same names already exist in your destination folder, they will be overwritten without warning.
- Export - To CSV File (SEISVECT)
Create a text file listing of the seismic data files currently listed, suitable for import into the Lynx Archive SEISVECT table.
- Export - WebSeisview Seismic List (Oracle Spatial)
Export the seismic list and locations into an Oracle Spatial table, suitable for use as a WebSeisview service. This export requires that the SEGY file paths in your seismic list are relative.
WebSeisview Seismic List Upload to Oracle Spatial
Enter the Oracle connection credentials in the login dialog to connect to your Oracle database.
Destination Table Name - enter the name of a table to which your seismic metadata records will be appended. If the table does not already exist, this export process will create the table, register it as a Spatial table, and then create a spatial index.
If the table exists, it must contain the following fields:
Field Name Field Type LINE_ID number not null primary key FILEPATH varchar2(256) not null LINENAME varchar2(20) not null FIRST_SP number(*,4) not null LAST_SP number(*,4) not null NUM_TRACES number not null TR_SPACING number(*,2) not null TMIN number not null TMAX number not null SAMP_INT number not null LAST_MOD timestamp not null/td> DESCRIPTION varchar2(200) not null GEOMETRY mdsys.sdo_geometry The table can contain other fields - these will be ignored, but you can populate them manually if required.
Input Coordinate System SRID - select the coordinate projection system code from Oracle Spatial's list of projection systems. For WebSeisview, and for use as KML, all coordinates must be stored in WGS84. If your input LOC file contains lat/lon coordinates, it is recommended that you switch the coordinate display type before running this Export - then no projection conversion will be required, as the Oracle Spatial WGS84 SRID (4326) will be selected automatically. However, if your input LOC file only contains projected XY coordinates, you must select the correct projection code here
Create Line ID values - select from Increment and Sequence
Line ID increment start value - if you select Increment above, LINE_ID values will be generated by incrementing from this value
Line ID sequence - if you select Sequence above, enter the name of an Oracle Sequence to be used to generate the LINE_ID values
Line Description (optional) - enter a string which will be inserted into the DESCRIPTION field of each record added to the Oracle table
After you have exported your seismic list, you can create a new WebSeisview service to display the seismic lines:
- Create the WebSeisview SEGY Root folder - on the web server, create a new service folder in the C:\webseisview folder, (eg C:\webseisview\Smith), then create a SEGY folder in here (eg C:\webseisview\Smith\SEGY)
- Create the WebSeisview Tile cache folder inside your service folder (eg C:\webseisview\Smith\cache)
- Copy your SEGY files into your new SEGY root folder (make sure the relative paths in your seismic list match up with the SEGY root folder to create absolute filepaths
- Log in to the WebSeisview Admin web app to create a new service for your data - use your Oracle connection credentials and the SEGY Root folder and Tile Cache folder you have just created
- Export - WebSeisview Horizons (Oracle Spatial)
Upload interpreted seismic horizons from polyline XYZM shapefiles into Oracle Spatial, for display in a WebSeisview service.
WebSeisview Horizon Upload to Oracle Spatial
Enter the Oracle connection credentials in the login dialog to connect to your Oracle database.
Input horizon shapefile - select an input horizon shapefile. The coordinate system must be WGS84. The shapefile should contain a single horizon for multiple lines, stored as polyline XYZM (with shotpoint values as measures, and TWT in msec as the Z coordinate. Multiple line parts for each seismic line are valid. The first attribute field of the shapefile must be the seismic line name
Horizon display name - the name of the horizon. By default, the shapefile name is used. You may edit this if required.
Horizon dispaly colour - select the colour to use for display of this horizon in WebSeisview
Existing Seismic Table Name - all seismic lines in this horizon shapefile must have already been uploaded into Oracle Spatial. Enter the name of the seismic list table to use to look up seismic line names.
Horizon Table Name - enter the name of a table to which your horizon geometries will be appended. If the table does not already exist, this export process will create the table, register it as a Spatial table, and then create a spatial index.
If the table exists, it must contain the following fields:
Field Name Field Type HORIZON_ID number not null primary key LINE_ID number not null HORIZON_NAME varchar2(50) not null HORIZON_COLOR varchar2(20) not null GEOMETRY mdsys.sdo_geometry The table can contain other fields - these will be ignored, but you can populate them manually if required.
Create Horizon ID values - select from Increment and Sequence
Horizon ID increment start value - if you select Increment above, HORIZON_ID values will be generated by incrementing from this value
Horizon ID sequence - if you select Sequence above, enter the name of an Oracle Sequence to be used to generate the HORIZON_ID values
- Export - To Seismap Shape File
- Print

Print the current tab page.
- Open Parameter File
Select a parameter file from the standard Open dialogue. Lynx Seismatch parameter files have the extension .SML.
The display parameters used in Seismatch are the same as the display parameters used by BASEVIEW, except they are saved in a file with extension SML instead of BVW. The parameter file stores map display settings as well as seismic search and match parameters, and seismic rewrite (SP/XY header insert) and XY extract parameters. - Save Parameter File As
Save the current parameters to a file using the standard Save As dialogue.
Seismatch parameter files have the extension .SML
To create default display parameters for Seismatch save your parameter file into your USER CUSTOM folder (usually c:\data\custom) as DEFAULT.SML. If this file exists, all parameters will be read from here rather than from the system-default values
3.1.2 Locations menu
- Edit Display Properties
Displays a PRMEDIT window to edit the display parameters. See BaseView Parameters for details.
The standard view manipulation functions on this menu are described in Viewer Common Functionality - Main Toolbar
- Select
The standard selection tools on this menu are described in Viewer Common Functionality - Selection Toolbar
- Reload Locations File
Re-read the current locations file and refresh the map view
- Set Scale
Set the base scale for display of the location data as a ratio (eg 1: 250000). You can zoom in and out from this base scale using the options in this menu, but this scale will be used to print the map.
- Set Linename Field
Input Lynx LOC files have an explicit LINENAME field, but input polyline-M shape files may have a number of attributes in the shape file attribute table. This option allows you to select one of the fields in the attribute table to use as the seismic line name. After you change the field used as the linename, you will see the line labels change in the map view.
- Rename Line
Select a line on the map using the selection tools to enable this option. You can rename lines in your input locations - enter the new name for the line in the dialogue displayed. However, Seismatch encourages you to change line names in your seismic data files to match the locations, and provides tools to enable you to do this, rather than the other way around.
3.1.3 Seismic menu
- Search Folder Options

Lynx Seismatch can search for seismic data files to add to your seismic list. The following parameters are displayed in a PRMEDIT dialogue:
Folder Search Options
Start In Folder - browse for the folder which contains your seismic data files. Lynx Seismatch can recognise standard SEG-Y and Lynx Trace File formats.
Search Sub-Folders - Yes or No - select YES to perform a recursive search of all sub-directories under your start folder, or select NO to limit the search to the folder specified above.
Search Method - select one of the following options:
- Add All versions of seismic files - all seismic files will be added to your seismic list
- Add Most Recent versions (last modified) - compares the last-modified date of all files with same root filename (ignoring extension) in each directory; only the most recently modified version will be added to your seismic list
- Add Highest numbered versions - compares the final character of the extension for all files with the same root filename; only the version with the highest TR (or SG) number will be added to your seismic list. No distinction is made between Lynx trace files and SEG-Y files.
- Add seismic files Matching Wildcard - specify a wildcard below
Match Wildcard - select a file wildcard (for example *.mig or 85*.*)
- Search Folder

Start searching for seismic files using the current search parameters (see above)
- Add Files

Select seismic files to add to your seismic list using a standard Open dialogue. You can also drag files from an Explorer window onto the Seismic List tab page.
- Open Seismic List
Open a previously saved seismic list using the standard Open dialogue.
- Save Seismic List As
Seismic lists can be saved as dBASE tables (with extension .dbf). Select a file name using the standard Save As dialogue.
- Reread Seismic Files (Refresh List)
Re-read all or selected seismic data files in your seismic list. The linename, shotpoint range, number of traces and trace separation will be re-read from the file header. If you have edited any of these values in the list, then these changes will be lost.
- Read Irregular Shotpoints
Read the first and last shotpoint values from trace headers for all or selected seismic data files in your seismic list. This will read the auxiliary shotpoint value from the 1st trace and last trace of Lynx TR files, and set the shotpoint increment to zero. Irregular shotpoint ranges cannot be written back into the seismic file header or seismic trace headers by Seismatch. For standard or "revision 1" SEGY files, not converted from Lynx trace files, shotpoint values will be read from the standard shotpoint bytes 21-24 in the trace headers, in an attempt to establish the first and last shotpoint and to copy these values to the seismic list. No attempt is made to correct for repeated integer shotpoint values when the incremtn is less than one shotpoint per trace. This process may not always work - it relies on the shotpoint values having been correctly placed in the trace headers in the first place!
- Rewrite Seismic Files Options
If you have modified linenames, shotpoint ranges or shotpoint separations in your seismic list in order to reconcile your seismic data with your seismic locations, you can save the changes back to the original seismic data files. This menu option sets the parameters which will be used by the Rewrite Seismic Files menu option below.
You can also insert shotpoint and coordinate values into the headers for each trace.
A PRMEDIT wizard displays the following parameters:
Rewrite Seismic File Options
Modify seismic data files
Save Linename - Yes or No
Save Client - Yes or No
Save SP Range - Yes or No
Save Trace Separation - Yes or No
These options determine whether the file header of each SEG-Y or Lynx Trace file will be modified.
The linename is written into the text header (EBCDIC for SEG-Y or ASCII for Lynx Trace files) at the start of each file into C-Card 2.
The client is written into the text header (EBCDIC for SEG-Y or ASCII for Lynx Trace files) into C-Card 1.
The shotpoint range is written into the binary file header for Lynx Trace files. For SEG-Y files, the shotpoint range will also be written into the binary file header in a non-standard SEG-Y slot (SEGYL3 format). A Lynx-specific flag will also be added to the SEG-Y binary file header to enable other Lynx applications (including Lynx Seismap) to read the shotpoint range. Note that for pure SEGY input files (i.e. those not derived from Lynx trace files, or Lynx modified SEGY) an attempt will be made to calculate the shotpoint increment per trace and insert this into the Lynx-specific area of the binary file header, but this relies on the shotpoints in the trace headers being correct.
The trace separation in metres is written into the binary header for Lynx Trace files, and into a non-standard field in the binary file header of SEG-Y files, which can be read by other Lynx applications. Note that the trace separation is calculated by multiplying the shotpoint spacing by the SP/trace increment.Trace Headers
Insert SP Values into trace headers - Yes or No
Insert XY coordinates into trace headers - Yes or No
This will allow you to insert interpolated shotpoint and coordinate values into the headers for each trace.
For Lynx TR-files, SPs and/or XYs will be inserted in the standard SPNo and SPAux fields in each trace header.
SEG-Y files will be re-written as SEG-Y Lynx Variant 3 (SEGYL3), which is compatible with SEG-Y Revision 1. Shotpoints will be stored as scaled integers in bytes 197-200 and 201-202 (as well as in 17-20 as an integer), and XY coordinates will be stored in bytes 181-184 and 185-188 (as well as in the standard Source and Group slots). - Rewrite Seismic Files
Save the changes you have made to linenames and shotpoint ranges in the seismic list back to the seismic data files. This uses the parameters set in Rewrite Seismic Files Options (above), to reset the linename and shotpoint range in each seismic file header, and optionally insert shotpoint and coordinate values into each trace header.
You can chose to apply changes to All files in the seismic list, or Selected files in the seismic list
- Extract Coordinate Options
If you have seismic data files which contain coordinates in trace headers, you can read those coordinates to create a Lynx LOC file.
This menu option sets the parameters which will be used by Extract Coordinates below.A PRMEDIT wizard displays the following parameters:
Extract Coordinate Options
Shotpoint Values - select from:
- Calculated - (default) shotpoint values for each trace are derived from the First SP and SP increment in the seismic list.
- Extracted - shotpoint values are read from each trace - see Extract Shotpoint Options below.
- All - (default) read coordinates for every trace in each seismic file.
- Ends - read coordinates for just the first and last trace in each seismic file.
- Increment - read coordinates for first, last and every nth trace.
Trace Increment - specify the increment n to use (see above).
Extract Shotpoint Options
This page is displayed if you select Shotpoint Values - Extracted on the previous page. These parameters specify how to read shotpoint values from the trace headers.
SP Extract Configuration - select from
- Lynx TR - read shotpoint from the standard SPAux slot used by Lynx Trace file. This option is not valid for SEG-Y files.
- Standard SEG-Y - read shotpoint as an integer value from bytes 17-20. This may give traces with duplicate shotpoints since shotpoint values may be rounded to the nearest integer. There are 3 possible workarounds for this: firstly, you could use Calculated shotpoints (ie do not read shotpoints from trace headers directly, but edit the seismic list to contain correct SP ranges before extracting coordinates); secondly, you could set the Read Traces Increment to a value greater than the number of traces per shotpoint (this way you will avoid having duplicate shotpoints in the generated LOC file, but the accuracy of the coordinates will leave a lot to be desired); thirdly, for SEG-Y files generated by Lynx programs, you could use the Lynx SEG-Y option below
- Custom SEG-Y - define the header field and data format of the shotpoint values to read - see below. This option is not valid for Lynx Trace files.
- Lynx SEG-Y and SEG-Y Revision-1 - for SEGYL3 and SEGYREV1 input files, shotpoint values are read as scaled integers from bytes 197-200 and 201-202. For older SEG-Y files generated by Lynx programs, the shotpoint values may have been inserted as floating point values into a non-standard header field. This option attempts to read the shotpoint value as a 4-byte reverse IBM floating point value from header bytes 181-184.
The following parameters are enabled for Custom SEG-Y configuration mode:
SP Value Header Byte Offset - 197 (default - SEG-Y Revision 1)
Format - Integer (default), Floating Point
Integer Type - 2-byte, 2-byte Reverse, 4-byte, 4-byte Reverse (default)
Float Type - IEEE, IEEE Reverse, IBM, IBM Reverse
Apply SP Scalar - Yes (default), No
SEG-Y Revision 1 introduces the concept of a scalar for shotpoint values, to enable floating-point shotpoints to be stored in integer trace header fields. The scalar value will be used as a multiplier if positive or divisor if negative.
SP Scalar Value Header Byte Offset - 201 (default - SEG-Y Revision 1)
SP Scalar Integer Type - 2-byte, 2-byte Reverse (default)Extract XY Coordinates Options
XY Extract Configuration - select from:
- Lynx TR - read coordinates from the standard Group X and Group Y trace header fields used by Lynx Trace files. This option is not valid for SEG-Y files.
- Standard SEG-Y - read coordinates from the standard Source X (73-76) and Source Y (77-80) trace header fields as 4-byte reverse (big-endian) integers. Coordinate values are scaled by the value read from header bytes 71-72. The coordinate units flag (length (1), seconds (2), or decimal degrees (3 - introduced by SEG-Y Revision 1)) is read from header bytes 89-90). This option is not valid for Lynx Trace files.
- Custom SEG-Y - define the header fields and data format of the coordinate values to read - see below. This option is not valid for Lynx Trace files.
- Lynx SEG-Y and SEG-Y Revision-1 - for SEGYREV1 and SEGYL3 files, XY coordinates are read from bytes 181-184 and 185-188. For older Lynx SEG-Y files, XY coordinates are read from the standard Group coordinate slot
X Value Header Byte Offset - default 73 (SEG-Y Source X)
Y Value Header Byte Offset - default 77 (SEG-Y Source Y)
Format - Integer (default), Floating Point
Integer Type - 2-byte, 2-byte Reverse, 4-byte, 4-byte Reverse (default)
Float Type - IEEE, IEEE Reverse, IBM, IBM Reverse
Apply XY Coordinat Scalar - Yes (default), No
If a coordinate scalar is applied, this scalar is applied to the stored coordinate values to give the real value.
If the scalar is negative it is used as a divisor; if it is positive it is used as a multiplier. For example, using the scalar value of -10, the real coordinate value 506343.2 will be stored as 5063432.
XY Scalar Value Header Byte Offset - default 71
XY Scalar Integer Format - 2-byte, 2-byte Reverse (default)
Extract Coordinate Units Flag - Yes (default), No
Coord Units Header Byte Offset - default 89
Coord Units Integer Type - 2-byte, 2-byte Reverse (default) - Extract Coordinates
Read coordinates from the trace headers of All or Selected files in the current seismic list, using the parameters set in Extract Coordinate Options above.
Linenames will be read from the seismic list, and a new temporary Lynx LOC file will be created and displayed. Any errors encountered while reading the coordinates will be displayed, and you will be given the opportunity to skip the seismic file, or cancel the coordinate extraction. - Delete Selected

Remove highlighted records from the seismic list.
- Clear List

Delete all records from the seismic list
- Edit Filepath Entries
By default Lynx Seismatch adds the absolute file-path of seismic files to the seismic list. To create a portable Seismap shape file which can be used on other PCs, you may need to edit the filepaths to use a relative path, or use an environment variable. This option allows you to edit the FILEPATH field in your seismic list for all records:
Edit Seismic Filepaths
Select one of the following options:
- Make all paths relative - the root folder specified below will be stripped from all filepaths
- Substitute environment variable - the root folder specified below will be stripped from all filepaths, and replaced by the environment variable specified below.
- Replace absolute path - replace the root folder path specified below with new root folder path.
Root Folder - type or browse for the folder path to remove from all file paths.
Environment Variable - enter the name of the environment variable to use - eg LIBYA_SEGY
Notation select whether to use a $-prefix or %-delimiters when inserting the environment variable in the filepath. %-delimiters are standard in Windows - for example %WINDIR%\notepad.exe - but this notation is not recognised by ESRI ArcGIS™ when using hyperlinks from attribute tables. If you wish to use ArcGIS hyperlinks therefore, you must use the $-prefix (which is actually the standard notation for unix/linux) (which will create a path which looks something like $WINDIR\notepad.exe). Lynx Seismap recognises both notations.Replace With - for the 'Replace absolute path' option above, specify the new root folder path to use for all filepaths in the seismic list.
3.1.4 Match menu
- Match Options

These options give you a visual indication of matching linenames and overlapping shotpoint ranges in your locations file and seismic list, and control the extrapolation algorithm used for display and export.
Location Overlay
Show SP Range Overlay - Yes or No - show or hide the shotpoint range overlay on the map view
Line Colour - select a colour to draw overlapping shotpoint ranges
Line Width - select a width for the overlapping shotpoint ranges - this should be greater than the width used to display lines in the Location Display Properties - Line Object Drawing parameters.Extrapolation algorithm - select the method used for extrapolation of shotpoints:
- 2nodes - each line will be extended in the direction specified by the first 2 nodes (for points before the start of the line) or the last 2 nodes (for points beyond the end of the line).
- LeastSq - create a least-squares best-fit line using the number of points specified below. This best-fit line is then used to extend the line. This method can produce better results when shotpoint coordinates are slightly irregular.
Number of nodes to fit - specify the number of points used for the Least-Squares extrapolation algorithm:
0 - use all points
1 - use the nearest point
2 - result will be the same as the 2nodes algorithm
Greater than 2 - create a least-squares fit.Minimum length %
When applying the Least-Squares extrapolation algorithm, very short extensions can appear to be dog-legged, if the existing end-point does not lie close to the best-fit line through the nodes. The extrapolated point will always lie on the best-fit line when using the Least-Squares algorithm. This threshold can be used to combine Least-Squares extrapolations for major line extensions with 2nodes extrapolations for minor line extensions.
If the calculated length of the extrapolated segment is less than this percentage of the total line length of all the segments used for the Least-Squares calculation, then the extrapolation will revert to 2nodes extrapolation.Seismic Line List
Highlight Linename Matches - Yes or No - show or hide the highlighting of matching linenames in the seismic list.
Highlight Colour - select a colour for the matching linename highlight
Shotpoints from Trace Headers (irregular first/last) Colour - select a colour to highlight irregular shotpoints, where the shotpoint increment is zero. - Match Lines

After you have made changes to the seismic list or to the input locations file, you can refresh the line-name matches and shotpoint overlaps using this option to re-reconcile the locations and seismic data.
- Associate Linename

This option allows you to interactively link locations to seismic files in your list, and set the linename for these selected seismic files.
This option is a toggle which changes the behaviour of the standard map select tools in the Locations - Select menu.While in Associate mode, the toolbar button and menu item will remain depressed - reselect the button or menu item to go back to normal mode.
In Associate mode you can select lines on the map using the Select Line
 or Select from List
  options. You will then be presented with a
dialogue listing all seismic files currently in your seismic list. Files which have a linename
matching the currently selected line will be highlighted. You can select and deselect files from
this list using the <Ctrl> or <Shift> keys in the standard way in which you select
multiple items in lists. When you click OK, the linenames of all selected files will be changed to
match the current line. Files which were deselected will have their linename set to a blank
string.
options. You will then be presented with a
dialogue listing all seismic files currently in your seismic list. Files which have a linename
matching the currently selected line will be highlighted. You can select and deselect files from
this list using the <Ctrl> or <Shift> keys in the standard way in which you select
multiple items in lists. When you click OK, the linenames of all selected files will be changed to
match the current line. Files which were deselected will have their linename set to a blank
string.
3.1.5 Report menu
This menu displays a number of different reconciliation reports in the Reconciliation Reports tab page
- Locations - Shotpoint Ranges
Lists the shotpoint ranges of each line in the input seismic locations file.
For input shape files, the measure values are read as shotpoint values. - Locations - Line Lengths
Lists the shotpoint range and length in km of each line in the input seismic locations file.
This option is only enabled when the input locations file coordinate system is projected XYs. - Locations - Repeated Linenames
Displays any linenames in the input seismic locations file which are not unique.
- Locations - Unmatched Linenames
Displays a list of linenames from your input locations file which do not match any of the seismic data files in your seismic list.
- Seismic - Unmatched Linenames
Displays a list of seismic data files from your seismic list which have linenames which do not match any of the linenames in your input locations file.
- Seismic - No Overlap
Displays a list of seismic data files from your seismic list where the shotpoint range does not overlap with the shotpoint range for the matching linename in your locations file.
- Seismic - Repeated Linenames
Displays a list of seismic data files from your seismic list which have linenames which are not unique. Note that repeated linenames may be intentional, since more than one seismic file can be associated with a seismic location.
- Seismic - Shot-toTrace
Displays a summary list of all seismic data files in the current seismic list. This report lists the filename, linename, first SP, last SP, number of traces, trace separation in metres, and line length in kilometres for each seismic data file. The report also summarises the total number of files, number of traces and kilometre count.
- Full Reconciliation Report
Displays a full reconciliation report. The linenames and shotpoint ranges of the locations file and seismic list are compared. If the locations file has projected XY coordinates, then line lengths are also calculated.
The following information is displayed.- LINENAME - matched between the seismic list and the locations file
- FILENAME - the name of the locations file and the name of the seismic data file
- FIRST SP - first shotpoint for the line in the locations file and in the seismic list
- LAST SP - last shotpoint for the line in the locations file and in the seismic list
- M/SP - average distance in metres between each shotpoint. For location data with XY coordinates this is calculated from the sum of the lengths of each segment . For seismic data files in your seismic list this value is calculated from the trace spacing value read from the file header of Lynx Trace files and Lynx-variant SEG-Y files, and may not be present in standard SEG-Y files. You can edit this value into your seismic list if you wish, and then save it to your SEG-Y files using the Seismic - Save Changes to Seismic Files menu option.
- LENGTH - total line length in km. For location data with XY coordinates this is the sum of the lengths of each segment. For seismic data it is calculated from the M/SP value and shotpoint range.
- OVERLAP - the overlapping length for the seismic data and location data is calculated from the overlapping shotpoint range and the average distance between each shotpoint (M/SP) for the location data and the seismic data.
- RESID - the residual length is the difference between the total length and the overlapping length.
The full report also lists non-unique linenames in the seismic locations and in your seismic list, seismic data files where the line name matches a location but the shotpoint range does not overlap, seismic files where the linename does not match any in the locations, and location linenames which do not match any of the seismic data files in your seismic list.
- Select All
Select all the text of the current report.
- Copy
Copy the highlighted text in the current report to the Windows clipboard.
- Save Report As
Save the current report to a text file using the standard Save As dialogue.
- Open Report in Microsoft Excel
Creates a new spreadsheet document listing all seismic data files in your current list.
3.2 Seismic List
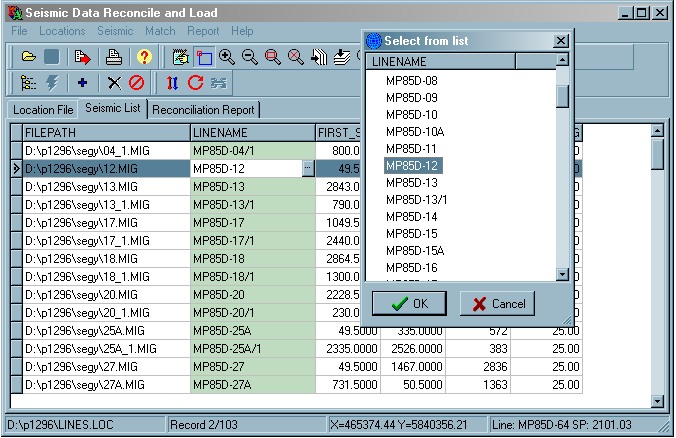
This screen shot shows the seismic file list. Linenames which match those in the current locations file are highlighted in green. You can edit the linenames by clicking the browse button (or pressing <Ctrl>+<Enter>) in the active linename edit cell and selecting a line from the list dialogue.
You can select multiple items by holding down the <Ctrl> key while selecting the item with the mouse, or select a range of items by holding down the <Shift> key and clicking the <Up> or <Down> arrow keys. These options are useful for the Delete Selected, Reread Seismic Files, Rewrite Seismic Files and Extract Coordinates menu options.
You can add seismic data files to the seismic list by dragging them from an Explorer window,
or using the Search Folder ![]() or Add
Files
or Add
Files ![]() menu options. The file paths displayed in the list can be edited manually (or by
using the Seismic - Edit File Paths menu option), but bear in mind
that if you alter the file paths, the Seismic List Refresh and
Save Changes to Seismic Files may not work correctly because the files
cannot be found.
menu options. The file paths displayed in the list can be edited manually (or by
using the Seismic - Edit File Paths menu option), but bear in mind
that if you alter the file paths, the Seismic List Refresh and
Save Changes to Seismic Files may not work correctly because the files
cannot be found.
Shotpoint ranges are read from the file header of Lynx Trace files and Lynx-variant SEG-Y files. The shotpoint range may not be present in the file header for standard SEG-Y files. In these cases you can edit the shotpoint range directly into the list. You can save the edited shotpoint range back into the SEG-Y files using the Save Changes to Seismic Files menu option, so that other Lynx programs (including Lynx Seismap) will be able to read the shotpoint range without scanning each trace.
You can Sort the grid on any of the columns by clicking a column header, or right-click the column header to display the header context menu, which has the following items:
- Sort - sort the seismic list in ascending order based on the values in this column.
- Copy To End - copy the field value from the current row into the same field for each subsequent row. This 'spreadsheet' functionality is intended to ease the editing of the 'CLIENT' field introduced in V1.10.
Each record in the seismic list has a context menu with the following items:
- Reread Seismic File - update the current record with the linename, shotpoint range and trace separation read from the seismic data file. This will undo any changes you have edited in manually and not yet saved.
- Read Irregular SPs from Seismic File - update the current record by reading the inserted (auxiliary) shotpoints from the first and last trace. The shotpoint increment will be set to zero to indicate that the increment is irregular.
- Open in SEISVIEW - open the current seismic data file in SEISVIEW (if installed) for viewing.
- Open in TRACEFIX - open the current seismic data file in TRACEFIX (if installed) for editing.
- Open in TRACEDMP - open the current seismic data file in TRACEDMP (if installed) to view the file and trace headers. This option can be used to determine the format of data in the trace headers before using the Extract Coordinate Options menu.
- File Attributes - display the LEA Object Attributes for the current seismic data file in a popup window.